
Kubota Workshop Manual
Kubota KX042-4 Workshop Manual
Document number RY911-25102 · English PDF edition · 480 pages
About this manual
Kubota published this Workshop Manual for the KX042-4 excavator models. It brings the documented service and technical-reference material for those named excavators into a single publication.
The manual is especially useful for work that crosses electrical and hydraulic systems: it includes electrical troubleshooting with connector views and pinouts, alongside hydraulic diagrams, pressure-test evidence, and valve-adjustment information.
Use the Manual Contents below to check that the exact repair, inspection, or maintenance procedure you need is included in this publication.
Manual details
- Manufacturer
- Kubota
- Manual type
- Workshop Manual
- Models
- KX042-4
- Document number
- RY911-25102
- Language
- English
- Page count
- 480
Product highlights
Electrical systems
The manual includes wiring diagrams, electrical troubleshooting, connector views, and pinouts.
Hydraulic systems
The manual includes hydraulic circuit diagrams, hydraulic pressure-test material, and hydraulic valve-adjustment material.
Specifications and settings
The manual includes reference information for torque specifications, wear limits, and capacities.
Special tools
A special-tools section is included.
Maintenance
The manual includes a maintenance schedule and a lubrication chart.
Manual contents
Use these source headings to locate the task or system you need in the PDF.
- TO THE READER — p. 1
- SUPPLEMENTARY INFORMATION — p. 2
- CONTENTS — p. 4
- I INFORMATION — p. 5
- INFORMATION — p. 6
- 1. SAFETY FIRST — p. 7
- 2. IN THE INTEREST OF WORK SAFETY — p. 8
- [1] WORKING SAFELY WITH THE EQUIPMENT MEANS ALWAYS FOLLOWING THESE INSTRUCTIONS: — p. 8
- (1) Precautions Before Working on the Machine — p. 8
- (2) Precautions Before Working on the Equipment — p. 9
- [1] WORKING SAFELY WITH THE EQUIPMENT MEANS ALWAYS FOLLOWING THESE INSTRUCTIONS: — p. 8
- 3. LABELS DISPLAYED TO PROMOTE WORK SAFETY — p. 12
- [1] LOCATIONS — p. 12
- [2] LABEL MAINTENANCE — p. 16
- 4. TABLE OF MAIN SPECIFICATIONS — p. 17
- 5. DIMENSIONS — p. 18
- INFORMATION — p. 6
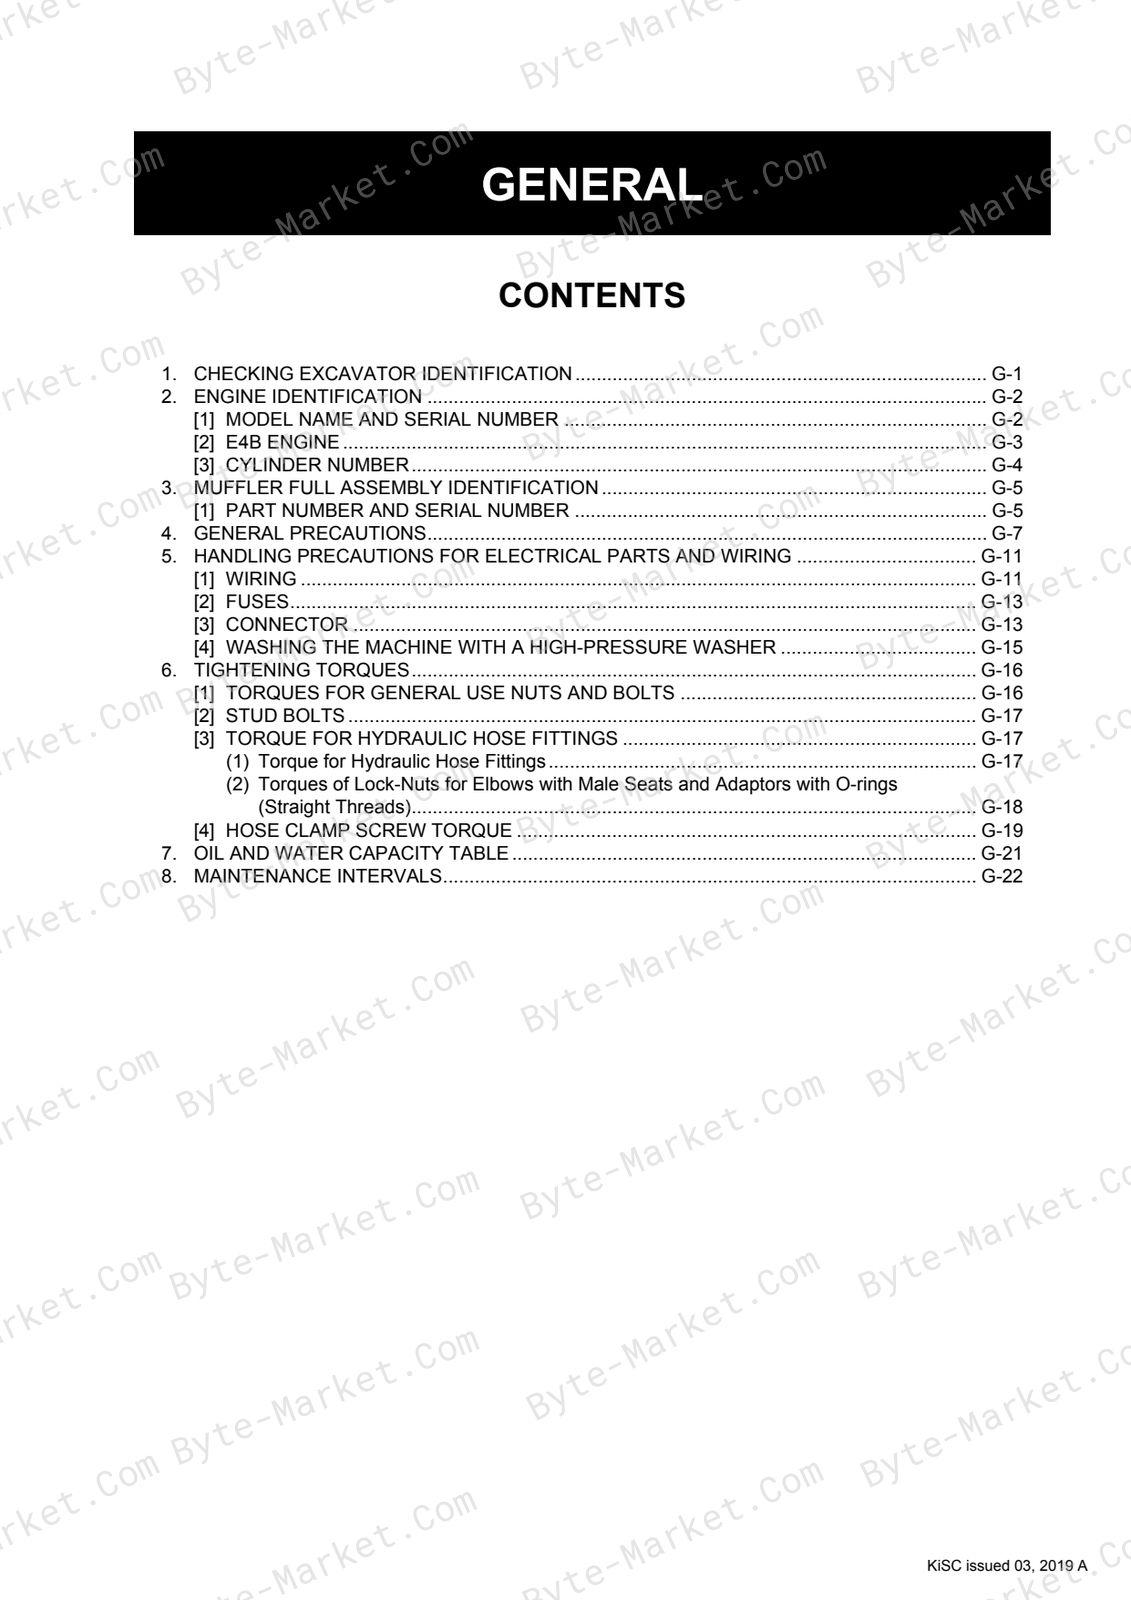
- G GENERAL — p. 19
- GENERAL — p. 20
- 1. CHECKING EXCAVATOR IDENTIFICATION — p. 21
- 2. ENGINE IDENTIFICATION — p. 22
- [1] MODEL NAME AND SERIAL NUMBER — p. 22
- [2] E4B ENGINE — p. 23
- [3] CYLINDER NUMBER — p. 24
- 3. MUFFLER FULL ASSEMBLY IDENTIFICATION — p. 25
- [1] PART NUMBER AND SERIAL NUMBER — p. 25
- 4. GENERAL PRECAUTIONS — p. 27
- 5. HANDLING PRECAUTIONS FOR ELECTRICAL PARTS AND WIRING — p. 31
- [1] WIRING — p. 31
- [2] FUSES — p. 33
- [3] CONNECTOR — p. 33
- [4] WASHING THE MACHINE WITH A HIGH-PRESSURE WASHER — p. 35
- 6. TIGHTENING TORQUES — p. 36
- [1] TORQUES FOR GENERAL USE NUTS AND BOLTS — p. 36
- [2] STUD BOLTS — p. 37
- [3] TORQUE FOR HYDRAULIC HOSE FITTINGS — p. 37
- (1) Torque for Hydraulic Hose Fittings — p. 37
- (2) Torques of Lock-Nuts for Elbows with Male Seats and Adaptors with O-rings (Straight Threads) — p. 38
- [4] HOSE CLAMP SCREW TORQUE — p. 39
- 7. OIL AND WATER CAPACITY TABLE — p. 41
- 8. MAINTENANCE INTERVALS — p. 42
- GENERAL — p. 20
- 1 MACHINE BODY — p. 48
- SERVICING — p. 49
- 1. FRONT — p. 51
- [1] REMOVING AND INSTALLING THE BOOM — p. 51
- [2] TABLE OF DIMENSIONS — p. 53
- (1) Quick Coupler Bucket — p. 53
- (2) Quick Coupler — p. 54
- (3) Arm — p. 55
- (4) Front Pin — p. 56
- (5) Front Bushings — p. 57
- (6) Blade — p. 58
- 2. SWIVEL FRAME — p. 59
- [1] REMOVING AND INSTALLING THE WEIGHT — p. 59
- [2] REMOVING AND INSTALLING THE CABIN — p. 59
- [3] REMOVING AND INSTALLING THE FUEL TANK — p. 61
- [4] REMOVING AND INSTALLING THE HYDRAULIC OIL TANK — p. 65
- [5] REMOVING AND INSTALLING THE ENGINE RELATED COMPONENTS — p. 66
- (1) DPF Muffler — p. 66
- (2) Engine — p. 69
- [6] ASSEMBLING OPERATING LEVERS — p. 72
- (1) Travel Lever — p. 72
- (2) Blade Lever — p. 72
- (3) Limit Switch — p. 73
- 3. TRACK FRAME — p. 74
- [1] REMOVING AND INSTALLING THE SWIVEL BEARING — p. 74
- [2] REPLACEMENT OF THE SWIVEL BEARING SEAL — p. 75
- [3] TRACK — p. 75
- (1) Removing and Installing the Rubber Track — p. 75
- [4] FRONT IDLER — p. 76
- (1) Removing and Installing the Front Idler — p. 76
- (2) Disassembling and Assembling — p. 77
- [5] GREASE CYLINDER — p. 79
- (1) Removing and Installing the Grease Cylinder — p. 79
- (2) Components — p. 79
- [6] TENSIONER — p. 80
- (1) Removing and Installing the Tensioner — p. 80
- (2) Components — p. 80
- [7] TRACK ROLLERS — p. 81
- (1) Removing and Installing the Track Roller — p. 81
- (2) Disassembling and Assembling — p. 81
- [8] CARRIER ROLLERS — p. 84
- (1) Removing and Installing the Carrier Roller — p. 84
- (2) Components — p. 84
- [9] TABLE OF DIMENSIONS — p. 85
- (1) Rubber Track — p. 85
- (2) Steel Track — p. 85
- (3) Idler Sprocket — p. 86
- (4) Carrier Rollers and Track Rollers — p. 86
- 4. MEASURING MACHINE PERFORMANCE — p. 87
- [1] MEASURING FRONT PERFORMANCE — p. 87
- (1) Measuring Swivel Gear Backlash — p. 87
- (2) Measuring Swivel Bearing Play — p. 88
- [1] MEASURING FRONT PERFORMANCE — p. 87
- 5. SWIVEL GEAR BACKLASH PERFORMANCE — p. 89
- 1. FRONT — p. 51
- SERVICING — p. 49
- 2 ENGINE — p. 90
- GENERAL — p. 91
- 1. ENGINE DEVICES LAYOUT — p. 92
- 2. SPECIFICATIONS — p. 94
- 3. DIMENSIONS — p. 96
- 4. PERFORMANCE CURVES — p. 97
- GENERAL — p. 91
- 3 HYDRAULIC SYSTEM — p. 98
- MECHANISM — p. 99
- 1. HYDRAULIC CIRCUIT DIAGRAM — p. 101
- [1] HYDRAULIC CIRCUIT DIAGRAM (STANDARD SPECIFICATIONS (AUX1, AUX2) — p. 101
- 2. HYDRAULIC DEVICE LAYOUT — p. 103
- 3. PUMP — p. 104
- [1] SPECIFICATIONS — p. 104
- [2] FUNCTION AND STRUCTURE — p. 106
- (1) Operating Principles — p. 106
- (2) Horsepower Control — p. 107
- (3) Flow Control (LS Control) — p. 108
- (4) Gain Control — p. 111
- (5) Standby Flow Amount — p. 111
- 4. CONTROL VALVE — p. 112
- [1] SPECIFICATIONS — p. 112
- [2] FUNCTION AND STRUCTURE — p. 115
- (1) Unload Valve Section — p. 115
- (2) Spool Section Operation — p. 118
- (3) Arm Regeneration Function — p. 120
- (4) Travel Section Operation — p. 121
- (5) Blade Section Operation — p. 122
- (6) Anti-Drift Function — p. 123
- (7) Signal Circuit — p. 124
- 5. SWIVEL MOTOR — p. 125
- [1] SPECIFICATIONS — p. 125
- [2] FUNCTION AND STRUCTURE — p. 126
- (1) Operating Principles — p. 126
- (2) Shockless Valves — p. 127
- (3) Parking Brake — p. 128
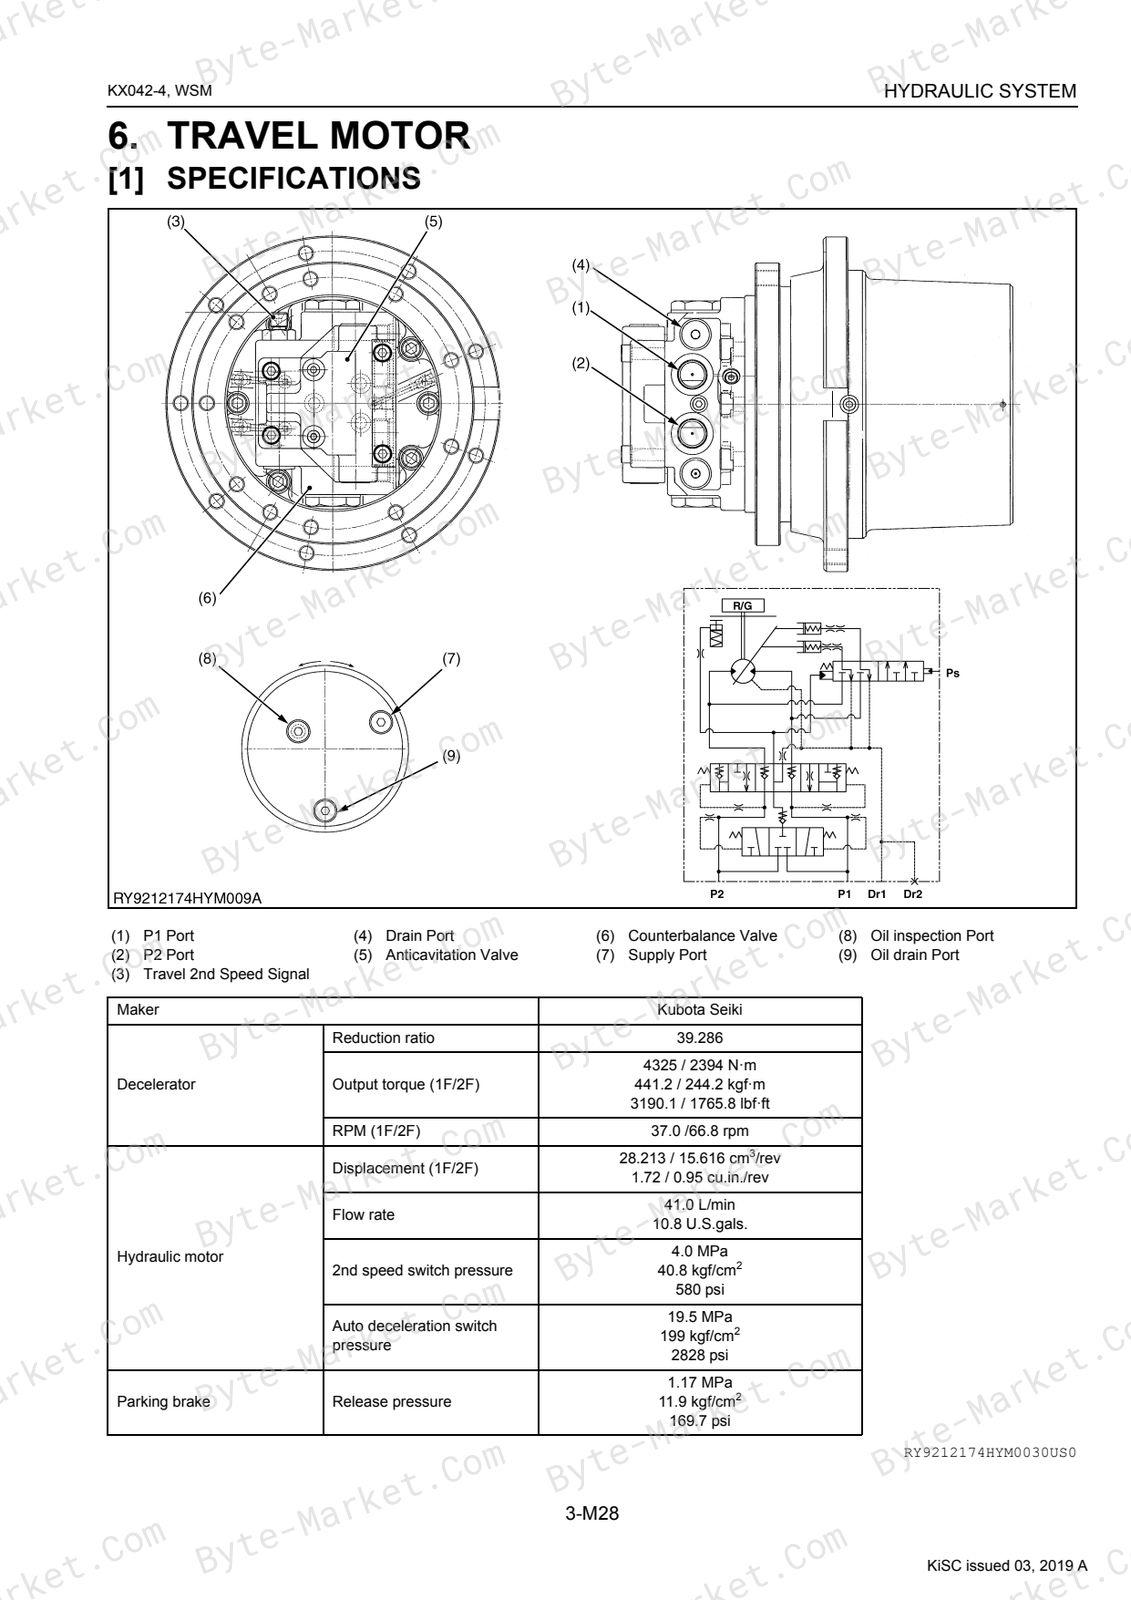
- 6. TRAVEL MOTOR — p. 129
- [1] SPECIFICATIONS — p. 129
- [2] FUNCTION AND STRUCTURE — p. 130
- (1) Operating Principles — p. 130
- (2) Counterbalance Valve — p. 130
- (3) Anti-Cavitation Valve — p. 132
- (4) Auto-Decelerator Function — p. 135
- (5) Parking Brake — p. 136
- (6) Decelerator — p. 137
- 7. HYDRAULIC CYLINDER — p. 138
- [1] SPECIFICATIONS — p. 138
- [2] FUNCTION AND STRUCTURE — p. 139
- (1) Operating Principles — p. 139
- 8. PILOT VALVE — p. 141
- [1] CONTROL PILOT VALVES — p. 141
- (1) Specifications — p. 141
- (2) Function and Structure — p. 142
- [2] TRAVEL PILOT VALVE — p. 143
- (1) Specifications — p. 143
- (2) Function and Structure — p. 144
- [3] SWING PILOT VALVE — p. 146
- (1) Specifications — p. 146
- (2) Function and Structure — p. 147
- [4] BLADE PILOT VALVES — p. 148
- (1) Specifications — p. 148
- (2) Function and Structure — p. 149
- [1] CONTROL PILOT VALVES — p. 141
- 9. SOLENOID VALVE — p. 151
- [1] UNLOAD VALVE — p. 151
- (1) Specifications — p. 151
- (2) Function and Structure — p. 152
- [2] AUX SOLENOID VALVE — p. 154
- (1) Specifications — p. 154
- (2) Function and Structure — p. 156
- [3] EP MODE SOLENOID VALVE — p. 157
- (1) Specifications — p. 157
- [1] UNLOAD VALVE — p. 151
- 1. HYDRAULIC CIRCUIT DIAGRAM — p. 101
- SERVICING — p. 158
- 1. PUMP — p. 160
- [1] REMOVING AND INSTALLING THE PUMP — p. 160
- [2] DISASSEMBLING AND ASSEMBLING THE PUMP — p. 163
- (1) Disassembling — p. 163
- (2) Assembling — p. 167
- 2. CONTROL VALVE — p. 171
- [1] REMOVING AND INSTALLING THE CONTROL VALVE — p. 171
- [2] DISASSEMBLING AND ASSEMBLING THE CONTROL VALVE — p. 172
- [3] CONTROL VALVE COMPONENTS — p. 174
- 3. SWIVEL MOTOR — p. 180
- [1] REMOVING AND INSTALLING THE SWIVEL MOTOR — p. 180
- [2] DISASSEMBLING AND ASSEMBLING THE SWIVEL MOTOR — p. 182
- (1) Disassembling — p. 182
- (2) Assembling — p. 185
- 4. SWIVEL JOINT — p. 189
- [1] REMOVING AND INSTALLING THE SWIVEL JOINT — p. 189
- [2] DISASSEMBLING AND ASSEMBLING THE SWIVEL JOINT — p. 192
- (1) Disassembling — p. 193
- (2) Assembling — p. 194
- 5. TRAVEL MOTOR — p. 196
- [1] REMOVING AND INSTALLING THE TRAVEL MOTOR — p. 196
- [2] DISASSEMBLING AND ASSEMBLING THE TRAVEL MOTOR — p. 197
- (1) Disassembling — p. 197
- (2) Assembling — p. 203
- [3] SPECIAL TOOLS — p. 212
- 6. HYDRAULIC CYLINDER — p. 214
- [1] TIGHTENING TORQUE — p. 214
- 7. PILOT VALVE (CONTROL) — p. 216
- [1] CONTROL PILOT VALVES — p. 216
- (1) Disassembling — p. 217
- (2) Assembling — p. 220
- (3) Special Tools — p. 224
- [2] TRAVEL PILOT VALVE — p. 225
- (1) Disassembling — p. 226
- (2) Assembling — p. 230
- [3] SWING PILOT VALVE — p. 234
- (1) Disassembling — p. 235
- (2) Assembling — p. 238
- [4] BLADE PILOT VALVES — p. 243
- (1) Disassembling — p. 245
- (2) Assembling — p. 247
- [1] CONTROL PILOT VALVES — p. 216
- 8. SOLENOID VALVE — p. 251
- [1] UNLOAD VALVE — p. 251
- [2] AUX SOLENOID VALVE — p. 252
- [3] EP MODE SOLENOID VALVE — p. 253
- 9. ROUTING OF HYDRAULIC HOSES — p. 254
- [1] TYPES OF HYDRAULIC HOSES — p. 254
- [2] HIGH-PRESSURE HOSES — p. 255
- (1) Deliver Hose Routing — p. 255
- (2) Front Hose Routing — p. 257
- (3) Travel, Swivel, Blade, Swing and Angle Hose Routing — p. 260
- (4) Swivel and Rotary Joint Hose Routing — p. 261
- (5) Undercarriage Hose Routing — p. 262
- (6) Hose Routing Inside the Track Frame — p. 263
- [3] LOW-PRESSURE HOSES — p. 264
- (1) Suction Pipe and Hose Routing — p. 264
- (2) Drain Hose Routing — p. 265
- [4] PILOT HOSES — p. 266
- (1) Port P Hose Routing (1/2) — p. 266
- (2) Port P Hose Routing (2/2) — p. 267
- (3) Port T Hose Routing — p. 268
- (4) Pilot Valve Hose Routing (1/2) — p. 269
- (5) Pilot Valve Hose Routing (2/2) — p. 271
- (6) Pilot Valve Hose Routing (Control Valves) — p. 272
- (7) Pilot Valve Hose Routing (Around the Driver's Seat) — p. 273
- 10. MEASURING HYDRAULIC DEVICE PERFORMANCE — p. 274
- [1] PISTON PUMP AIR BLEEDING PROCEDURE — p. 274
- [2] RELEASE OF RESIDUAL PRESSURE IN THE HYDRAULIC SYSTEM — p. 275
- [3] MANUAL BOOM LOWERING PROCEDURE — p. 276
- [4] MEASURING THE FLOW RATE — p. 277
- (1) Measuring Main Pump Flow — p. 277
- (2) Measuring the AUX Proportional Limit — p. 278
- (3) Measuring AUX Discharge Flow — p. 279
- [5] MEASURING PRESSURE — p. 280
- (1) Measuring the Main Relief Valve Pressure — p. 280
- (2) Measuring Pilot Secondary Pressure — p. 282
- (3) Measuring the EP Proportional Solenoid Pressure — p. 283
- (4) Measuring the Overload Relief Valve Pressure — p. 284
- (5) Pressure Measuring Kit — p. 286
- (6) Measuring Swivel Relief Pressure — p. 287
- (7) Adjusting the LS Control Differential Pressure Adjusting Spring — p. 288
- [6] MEASURING SWIVEL PERFORMANCE — p. 289
- (1) Measuring Swivel Motor Drain Volume — p. 289
- (2) Measuring Swivel Block Performance — p. 290
- (3) Measuring Swivel Speed — p. 291
- [7] MEASURING TRAVEL PERFORMANCE — p. 292
- (1) Measuring Travel Motor Drain Volume — p. 292
- (2) Measuring Travel Block Performance — p. 293
- (3) Measuring Travel Speed — p. 294
- (4) Measuring Travel Drift — p. 294
- [8] MEASURING CYLINDER SPEED — p. 295
- (1) Measuring Hydraulic Cylinder Operating Time — p. 295
- (2) Measuring Hydraulic Cylinder Drift — p. 297
- (3) Measuring Swing Cylinder Deviation — p. 298
- 11. HYDRAULIC DEVICE PERFORMANCE STANDARDS — p. 299
- [1] FLOW RATE — p. 299
- (1) Main Pump Discharge Flow Rate Data (Measured Values) — p. 299
- (2) AUX Discharge Flow Rate Data (Measured Values) — p. 300
- [2] RELIEF PRESSURE (MEASURED VALUES) — p. 301
- [3] SWIVEL PERFORMANCE — p. 302
- [4] TRAVEL PERFORMANCE — p. 302
- [5] CYLINDER SPEED — p. 303
- [1] FLOW RATE — p. 299
- 12. TROUBLESHOOTING — p. 304
- [1] TROUBLESHOOTING ALL ACTUATORS — p. 304
- [2] TROUBLESHOOTING FRONT SYSTEMS — p. 305
- [3] TRAVEL SYSTEM TROUBLESHOOTING — p. 307
- [4] SWIVEL SYSTEM TROUBLESHOOTING — p. 308
- 1. PUMP — p. 160
- MECHANISM — p. 99
- 4 ELECTRICAL SYSTEM — p. 309
- SERVICING — p. 310
- 1. ELECTRICAL DEVICE LAYOUT AND WIRING CIRCUIT — p. 312
- [1] PRECAUTIONS ON HOW TO CLAMP THE ELECTRICAL WIRING — p. 312
- [2] PRECAUTIONS ON HANDLING ELECTRICAL CONNECTORS — p. 312
- 2. METER PANEL OPERATION — p. 315
- [1] NAMES AND FUNCTIONS OF METERS — p. 315
- [2] USER SETTINGS MODE — p. 315
- (1) Log Record — p. 316
- (2) Periodic Check — p. 316
- (3) Set Clock — p. 317
- (4) Set AUX Flow Ctrl — p. 318
- (5) Various Settings — p. 318
- (6) Language Setting — p. 318
- [3] SERVICE DEALER SETTING — p. 319
- (1) Crane Mode — p. 319
- (2) Arm Control Mode (Only on Japan Spec.) — p. 319
- [4] SERVICE/DEALER MODE — p. 320
- (1) Diagnosis — p. 322
- (2) Setting — p. 327
- [5] SETTINGS WHEN REPLACING ELECTRONIC DEVICES — p. 340
- (1) When Replacing the Meter or Main ECU — p. 340
- (2) When the Battery is Removed — p. 340
- [6] TABLE OF METER PANEL MESSAGES AND ERROR HISTORY LIST — p. 341
- (1) Red Warning Lamp Lit — p. 341
- (2) Yellow Warning Lamp Lit — p. 343
- (3) Other Screens — p. 345
- (4) PM Clog Level and the State of the Machine — p. 347
- (5) Table of Engine System Error Numbers — p. 350
- 3. INSPECTIONS — p. 351
- [1] POWER AND GROUND — p. 351
- [2] STARTING AND STOPPING DEVICE — p. 354
- [3] RELAY LAYOUT — p. 355
- 4. TROUBLESHOOTING (START-UP EQUIPMENT VERSION) — p. 357
- 5. METHODS FOR DIAGNOSING ERRORS — p. 358
- [1] GUIDE TO DIAGNOSING ERRORS — p. 358
- [2] ERROR DIAGNOSIS PROCEDURE — p. 358
- [3] TESTING WITH A CIRCUIT TESTER — p. 359
- 6. TROUBLESHOOTING (METER PANEL VERSION) — p. 360
- [1] MACHINE RELATED SYSTEM — p. 360
- (1) Engine Oil Pressure Errors — p. 360
- (2) Charging System Errors — p. 363
- (3) Fuel Sensor Errors — p. 366
- [2] FRONT-END SYSTEMS — p. 369
- (1) Lever Lock System Errors — p. 369
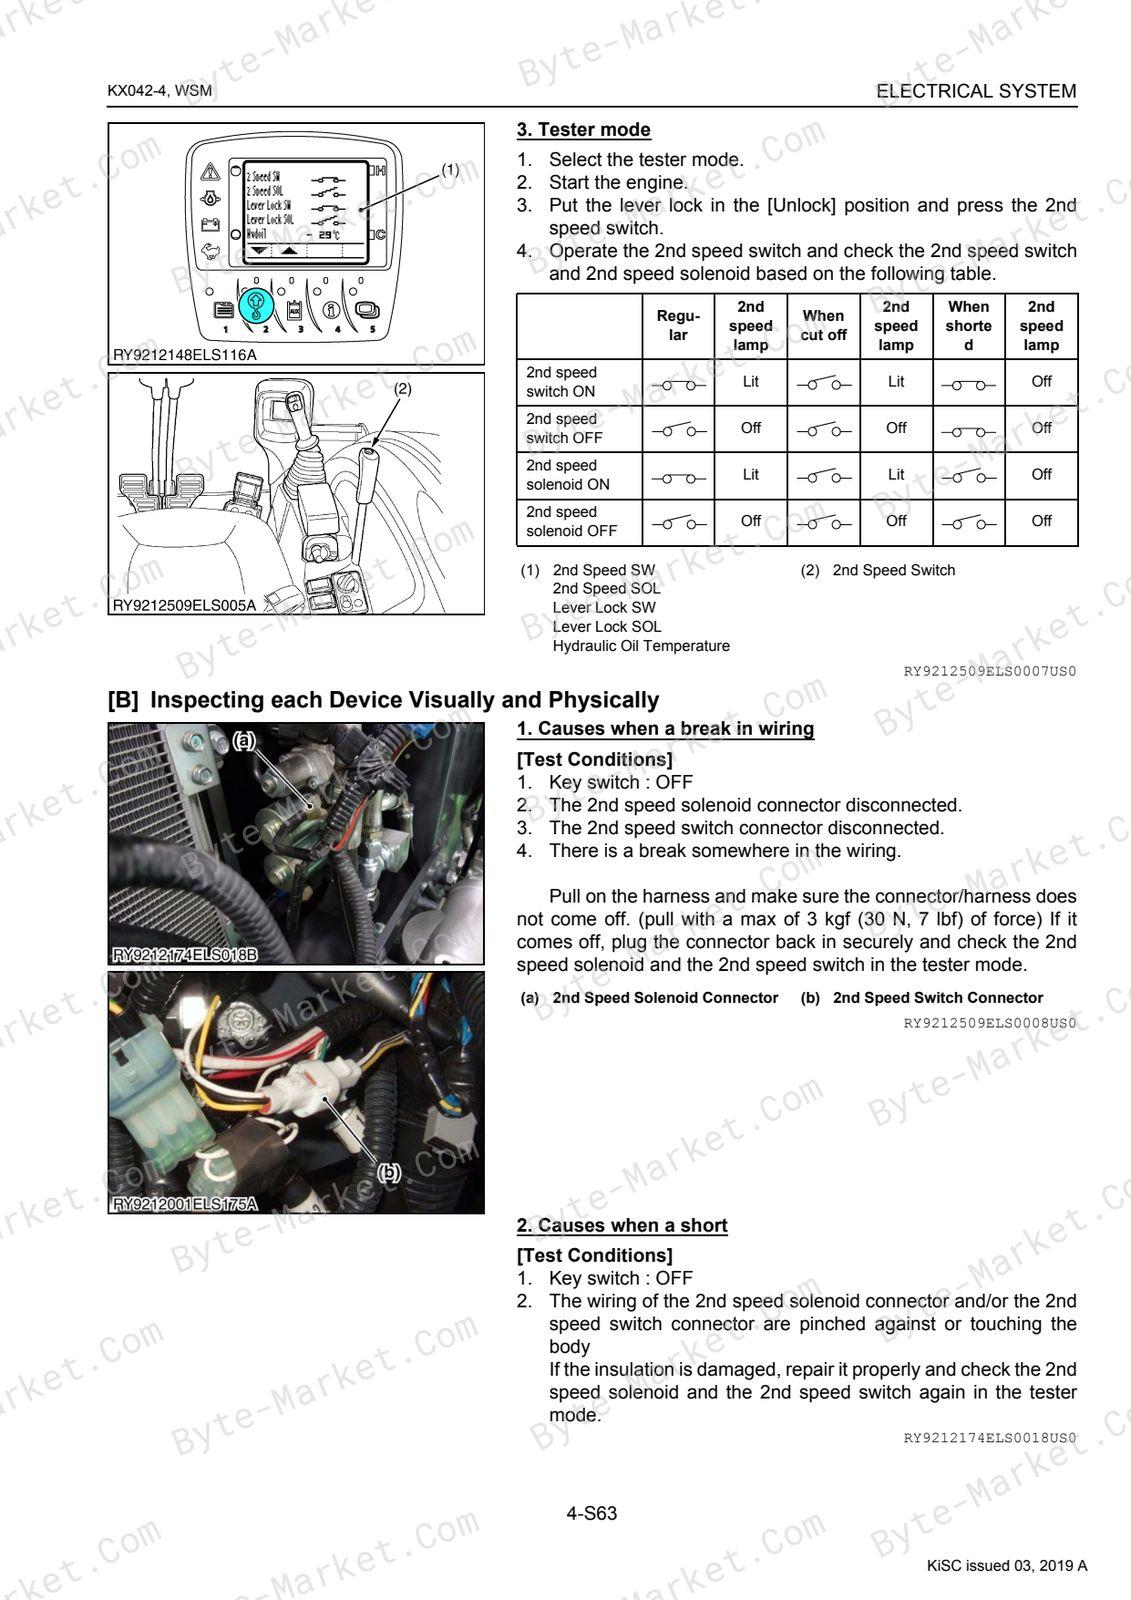
- (2) Travel 2nd Speed System Error — p. 373
- [3] AUTO IDLING (AI) SYSTEM — p. 377
- (1) AI System Errors — p. 377
- (2) Testing the AI Pressure Switch — p. 380
- (3) Testing the AI Switch — p. 382
- [4] POWER SUPPLY SYSTEM — p. 385
- (1) Over Voltage — p. 385
- (2) 5 V Short System Error — p. 386
- [5] COMMUNICATION SYSTEM — p. 387
- (1) CAN Communication Errors — p. 387
- [6] MULTIPURPOSE SWITCH — p. 392
- (1) Multipurpose Switch Control System Errors — p. 392
- [7] AUX SYSTEM — p. 394
- (1) AUX1 / AUX2 (Thumb) System Errors — p. 394
- [8] ECO MODE SYSTEM — p. 400
- (1) EP System Errors — p. 400
- [1] MACHINE RELATED SYSTEM — p. 360
- 7. DEALER SETTING MODE FLOWCHART — p. 405
- 1. ELECTRICAL DEVICE LAYOUT AND WIRING CIRCUIT — p. 312
- SERVICING — p. 310
- 5 CABIN — p. 408
- MECHANISM — p. 409
- 1. AIR CONDITIONING SYSTEM — p. 410
- [1] STRUCTURE — p. 410
- [2] HOW THE MECHANISMS OF THE SYSTEM WORK — p. 411
- [3] COMPRESSOR — p. 412
- [4] AIR CONDITIONING UNIT — p. 415
- [5] CONDENSER — p. 420
- [6] RECEIVER — p. 421
- [7] PRESSURE SWITCH — p. 422
- [8] ELECTRICAL SYSTEM — p. 423
- (1) Electrical Circuits — p. 423
- (2) Relays — p. 424
- (3) Blower Switch — p. 425
- 2. WIPER — p. 426
- [1] WIPER SWITCH — p. 426
- [2] WIPER — p. 426
- [3] WIPER MOTOR — p. 427
- 1. AIR CONDITIONING SYSTEM — p. 410
- SERVICING — p. 428
- 1. TROUBLESHOOTING — p. 429
- 2. SERVICE SPECIFICATIONS — p. 432
- 3. TORQUE — p. 433
- 4. PRECAUTIONS WHEN REPAIRING THE REFRIGERANT SYSTEM — p. 434
- [1] USE OF SERVICE TOOLS — p. 434
- (1) Manifold Gauge Set — p. 434
- (2) Refrigerant Charging Hoses — p. 436
- (3) Vacuum Pump Adapter — p. 437
- (4) Electric Gas Leak Tester — p. 437
- (5) Canister Tap Valve — p. 437
- (6) T-Joint — p. 438
- (7) R134a Refrigerant Collection/Recycling Device — p. 438
- [1] USE OF SERVICE TOOLS — p. 434
- 5. INSPECTING AND CHARGING THE REFRIGERANT SYSTEM — p. 439
- [1] CHECKING THE SYSTEM WITH A MANIFOLD GAUGE — p. 439
- [2] COLLECTION, VACUUMING AND CHARGING — p. 443
- (1) Collecting Refrigerant — p. 443
- (2) Vacuuming Out the System — p. 443
- (3) Charging from the High-Pressure Side — p. 445
- (4) Charging from the Low-Pressure Side — p. 445
- (5) Inspections and Troubleshooting — p. 446
- 6. INSPECTION AND DISASSEMBLY — p. 448
- [1] CHECKS AND ADJUSTMENTS — p. 448
- (1) Compressor — p. 448
- (2) Relays — p. 450
- (3) Blower Motor — p. 452
- (4) Blower Resistor — p. 453
- (5) Blower Switch — p. 454
- (6) Servo Motor (for Temp Control) — p. 455
- (7) Pressure Switch — p. 456
- [2] DISASSEMBLING AND ASSEMBLING — p. 457
- (1) Removing and Installing the AC Hoses — p. 458
- (2) Removing and Installing the Compressor — p. 459
- (3) Diagram of AC Hoses — p. 461
- (4) Removing and Installing the Condenser and Receiver — p. 462
- [1] CHECKS AND ADJUSTMENTS — p. 448
- 7. WINDOW WASHER — p. 463
- [1] WIPER SWITCH — p. 463
- [2] WIPER MOTOR — p. 464
- [3] WASHER MOTOR — p. 464
- 8. REMOVING AND INSTALLING THE GLASS — p. 465
- [1] PREPARATION — p. 465
- [2] REMOVING GLASS — p. 465
- [3] INSTALLING GLASS — p. 466
- [4] GLASS TRIM TYPE — p. 467
- [5] HOW TO REPLACE THE GLASS OF THE RIGHT-SIDE WINDOW — p. 467
- 9. FRONT WINDOW — p. 470
- [1] ADJUSTING THE CLOSING LOCK OF THE FRONT WINDOW (TOP) — p. 470
- [2] ADJUSTING THE OPEN LOCK OF THE FRONT WINDOW (TOP) — p. 471
- MECHANISM — p. 409
Capabilities
The source outline separates mechanism explanations from servicing instructions for Hydraulic System and Cabin. Use these indexed headings to locate the applicable system in the source PDF, then confirm model-specific notes, specifications, illustrations, and operating conditions at the relevant page before carrying out service work.
Keep the source's safety sequence, prerequisite steps, labels, units, configuration notes, and footnotes with the selected task; do not apply an isolated value outside the conditions stated in the manual.
Technical reference
Reference tables include torque settings, wear limits, and fluid and system capacities for service checks, adjustment work, and specification lookup. Use the values and conditions in the PDF for the applicable model and procedure.
- Service limits and settings: torque settings and wear limits.
- Fluid reference: fluid and system capacities.
Delivery
This manual is supplied as a digital PDF file and is available for instant download after purchase. No physical media is shipped.
References
Kubota Workshop Manual for Excavator, document code RY911-25102, PDF edition.


No questions found.