
Kubota Operator Manual
Kubota RT305T-2 Operator Manual
Document number TOB-0086435 · English PDF edition · 233 pages
About this manual
Kubota published this Operator Manual for RT305T-2. It is intended for safe operation, controls, routine checks, and source-supported maintenance, where those subjects appear in the source publication.
Use the Manual Contents below to check that the exact operating, safety, adjustment, or routine-maintenance topic you need is included in this publication.
Manual details
- Manufacturer
- Kubota
- Manual type
- Operator Manual
- Models
- RT305T-2
- Document number
- TOB-0086435
- Publication year
- 2023
- Language
- English
- Page count
- 233
Product highlights
Maintenance
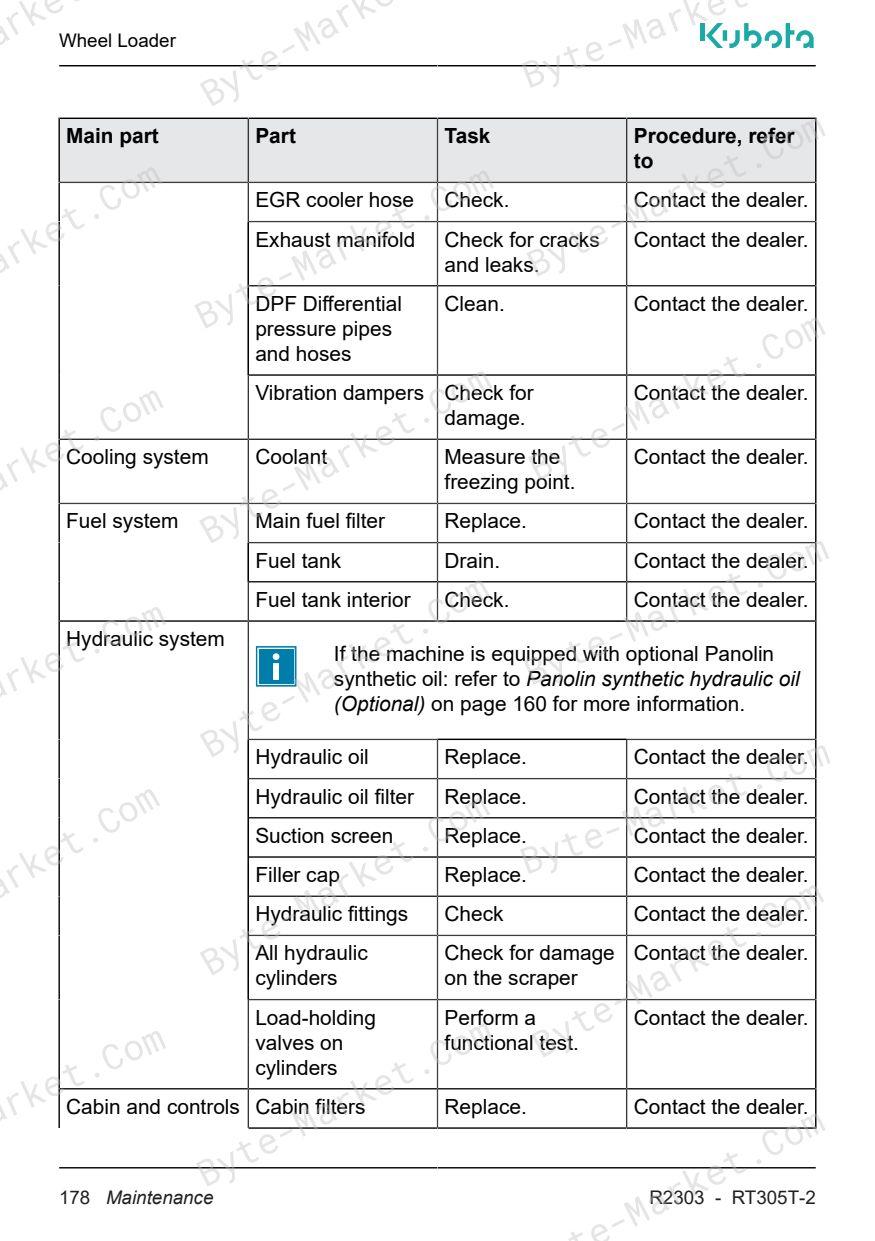
The manual includes a maintenance schedule and a lubrication chart.
Manual contents
Use these source headings to locate the task or system you need in the PDF.
- Preface — p. 3
- Applicable machines — p. 3
- Language — p. 4
- Manual storage — p. 4
- Icons and signal words used in the document — p. 4
- Illustrations — p. 5
- Recommissioning — p. 6
- Version history — p. 6
- Typographical conventions — p. 8
- EC DECLARATION OF CONFORMITY — p. 9
- 1 Introduction — p. 19
- 1.1 Exclusions — p. 19
- 2 Description — p. 21
- 2.1 Machine components — p. 21
- 2.2 Document holder (Optional) — p. 22
- 2.3 Towbar (Optional) — p. 23
- 2.4 Auxiliary connections (Joystick type 1) — p. 25
- 2.4.1 Front — p. 25
- 2.4.1.1 RT305T-2 — p. 25
- 2.4.2 Rear — p. 27
- 2.4.3 14-pin auxiliary connection (Front) (Optional) — p. 28
- 2.4.3.1 Activating the 14-pin auxiliary connection — p. 30
- 2.4.3.2 Activating the 3rd proportional auxiliary function — p. 31
- applicable) — p. 31
- 2.4.3.4 Using the 14-pin auxiliary connection (Front) — p. 32
- 2.4.3.5 Using the 12-V auxiliary connection (Front) — p. 33
- 2.4.1 Front — p. 25
- 2.5 Auxiliary connections (Joystick type 2) — p. 34
- 2.5.1 Front — p. 34
- 2.5.1.1 / — p. 34
- 2.5.2 Rear — p. 36
- 2.5.1 Front — p. 34
- 2.6 Electrical components — p. 37
- 2.6.1 Jump-start connections (Optional) — p. 39
- 2.7 Cabin — p. 40
- 2.8 ROPS and FOPS — p. 40
- 2.8.1 Available options — p. 41
- 2.9 License plate holders — p. 42
- 2.9.1 Available options — p. 42
- 2.10 Dashboard — p. 44
- 2.11 DCU (Display Control Unit) — p. 45
- 2.11.1 Controlling the DCU — p. 46
- 2.11.2 Main Screen — p. 47
- 2.11.2.1 Error Status — p. 48
- 2.11.2.2 Vehicle Status — p. 49
- 2.11.3 Menu Screen — p. 52
- 2.11.3.1 MCU and ECU fault codes — p. 53
- 2.11.3.2 Info Software — p. 56
- 2.11.3.3 General Settings — p. 57
- 2.12 Switch panels — p. 60
- 2.12.1 Switch panel steering column — p. 60
- 2.12.2 Right-hand switch panel (Cabin only) — p. 62
- 2.12.3 Rear right switch panel (Cabin only) — p. 64
- 2.12.4 Right-hand switch panel (Canopy only) — p. 66
- 2.13 Seat heating (Optional) — p. 68
- 2.14 Combination switch (Optional) — p. 69
- 2.15 Joystick type 1 — p. 70
- 2.16 Joystick type 2 — p. 71
- 2.17 Radio (Optional) — p. 72
- 2.18 Parallel indicator (Optional) — p. 73
- 2.19 Back up alarm (Optional) — p. 73
- 3 Applications — p. 75
- 3.1 Public road — p. 75
- 3.2 Trailer — p. 76
- 3.3 Working surface and environment — p. 76
- 3.4 Attachments — p. 77
- 4 Technical data — p. 79
- 4.1 General — p. 79
- 4.2 Diesel engine — p. 80
- 4.3 Tyres — p. 80
- 4.3.1 Tyre specifications — p. 80
- 4.4 Tipping loads — p. 81
- 4.4.1 RT305T-2 (Straight position) — p. 82
- 4.5 Dimensions — p. 84
- 4.6 Maximum slope angle — p. 85
- 5 Safety — p. 87
- 5.1 Liability — p. 87
- 5.2 Intended use of the machine — p. 88
- 5.3 Approved operator — p. 89
- 5.4 General safety rules — p. 89
- 5.5 Before starting the machine — p. 90
- 5.6 During operation — p. 90
- 5.7 Instability — p. 92
- 5.8 Driving on slopes — p. 93
- 5.9 Parking on slopes — p. 94
- 5.10 Public road — p. 94
- 5.11 Approved attachments — p. 95
- 5.12 Danger zone — p. 96
- 5.12.1 Towing the machine out of a danger zone — p. 96
- 5.13 Terrain — p. 96
- 5.14 Hydraulic system — p. 97
- 5.15 Operation with loads — p. 98
- 5.16 Fire and burn hazards — p. 99
- 5.17 Batteries — p. 99
- 5.18 Location of the safety labels — p. 100
- 5.19 Description of the safety labels — p. 101
- 6 Transport and storage — p. 107
- 6.1 Mounting the articulation lock bar — p. 107
- 6.2 Loading and unloading the machine — p. 109
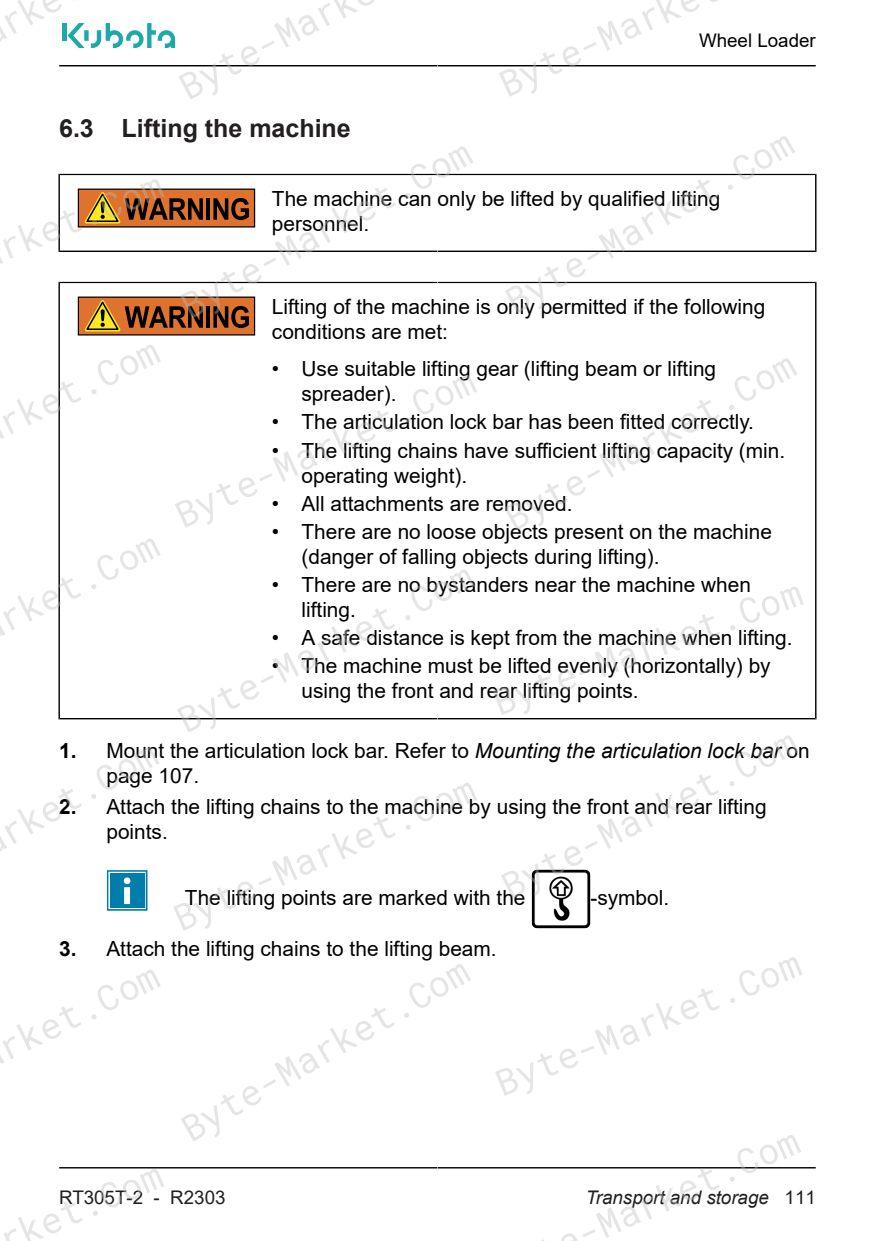
- 6.3 Lifting the machine — p. 111
- 6.4 Towing the machine — p. 112
- 6.4.1 Preparing — p. 112
- 6.4.2 Towing — p. 113
- 6.5 Storing the machine — p. 113
- 7 Commissioning — p. 115
- 8 Operation — p. 117
- 8.1 Entering and leaving the cabin — p. 117
- 8.1.1 Entering — p. 117
- 8.1.2 Leaving — p. 118
- 8.2 Adjusting the driver's seat — p. 118
- 8.3 Adjusting the steering column — p. 119
- 8.4 Using the sun visor — p. 120
- 8.5 Starting the machine — p. 121
- 8.5.1 Preparing — p. 121
- 8.5.2 Starting — p. 122
- 8.5.3 Access code (Optional) — p. 123
- 8.6 Switching the machine off — p. 124
- 8.7 Driving the machine — p. 125
- 8.7.1 Inching pedal — p. 126
- 8.7.2 Hand-throttle (Optional) — p. 127
- 8.7.3 Electronic Performance Control (EPC) (Optional) — p. 129
- 8.7.3.1 Pro-Inching® (Optional) — p. 129
- 8.7.3.2 Speed Lock (If applicable) — p. 131
- 8.8 Using the joystick — p. 132
- 8.8.1 Driving — p. 132
- 8.8.2 Tilting attachments — p. 133
- 8.8.3 Lifting arm — p. 134
- 8.8.4 Telescopic lifting arm — p. 135
- 8.9 Switching on the automotive lights (Optional) — p. 135
- 8.9.1 Using the automotive lights — p. 136
- 8.10 Using the heater (Optional) — p. 136
- 8.11 Using the cabin air-conditioning unit (Optional) — p. 137
- 8.12 Coupling and uncoupling the attachment — p. 138
- 8.12.1 Preparing — p. 138
- 8.12.2 Coupling — p. 139
- 8.12.3 Uncoupling — p. 139
- 8.13 Memory/Hold-function for auxiliary functions — p. 140
- 8.14 De-pressurizing hydraulic connections — p. 140
- 8.14.1 With mechanical levers — p. 141
- 8.14.2 Without mechanical levers — p. 142
- 8.14.3 Electrical de-pressurization (Optional) — p. 142
- 8.15 Switching the Float-function on the lifting arm on and off — p. 143
- 8.15.1 Switching on — p. 143
- 8.15.2 Switching off — p. 143
- 8.16 Engaging and disengaging the differential lock — p. 144
- 8.16.1 Engaging — p. 144
- 8.16.2 Disengaging — p. 145
- 8.17 Using the boom suspension (Optional) — p. 145
- 8.18 Fuel — p. 146
- 8.18.1 Adding fuel — p. 146
- 8.19 Regeneration — p. 147
- 8.19.1 6 levels of regeneration — p. 148
- 8.19.2 Activating parked regeneration — p. 153
- 8.1 Entering and leaving the cabin — p. 117
- 9 Maintenance — p. 157
- 9.1 Installing the safety bracket — p. 157
- 9.1.1 RT305T-2 — p. 158
- 9.2 Opening and closing the bonnet — p. 159
- 9.2.1 Opening — p. 159
- 9.2.2 Closing — p. 159
- 9.3 Panolin synthetic hydraulic oil (Optional) — p. 160
- 9.3.1 Requirements — p. 160
- 9.3.2 Test intervals — p. 161
- 9.3.3 Sample method — p. 161
- 9.4 Preventive maintenance schedules — p. 162
- 9.4.1 Operator maintenance — p. 162
- 9.4.1.1 Daily maintenance — p. 162
- 9.4.1.2 Maintenance every 100 hours — p. 165
- 9.4.2 Dealer maintenance schedules — p. 166
- 9.4.2.1 Maintenance before delivery — p. 166
- 9.4.2.2 Maintenance after the first 50 hours — p. 171
- 9.4.2.3 Maintenance every 500 hours — p. 172
- 9.4.2.4 Maintenance every 1000 hours — p. 175
- 9.4.2.5 Maintenance every 1500 hours — p. 176
- 9.4.2.6 Maintenance every 3000 hours — p. 177
- 9.4.2.7 Maintenance every 6000 hours — p. 177
- 9.4.2.8 Maintenance every 1 year — p. 177
- 9.4.2.9 Maintenance every 2 years — p. 180
- production date — p. 181
- 9.4.3 Dealer maintenance tasks — p. 181
- 9.4.3.1 Engine — p. 181
- 9.4.3.2 Cooling system — p. 183
- 9.4.3.3 Fuel system — p. 184
- 9.4.3.4 Hydraulic system — p. 185
- 9.4.3.5 Electrical system — p. 186
- 9.4.3.6 Cabin and controls — p. 187
- 9.4.3.7 Transmission and wheels — p. 188
- 9.4.3.8 Frame — p. 190
- 9.4.1 Operator maintenance — p. 162
- 9.5 Fluid specifications — p. 191
- 9.6 Electricity — p. 193
- 9.6.1 Overview fuses — p. 193
- 9.6.1.1 PCB (Printed Circuit Board) — p. 193
- 9.6.1.2 Main fuse — p. 197
- 9.6.1 Overview fuses — p. 193
- 9.7 Frame maintenance — p. 198
- 9.7.1 Preparing — p. 198
- 9.7.2 Lubrication points RT305T-2 — p. 199
- 9.7.3 Lubrication points cabin door/canopy (Optional) — p. 201
- 9.7.4 Checking tyres and wheels — p. 202
- 9.7.4.1 Tightening torques of wheel nuts — p. 203
- 9.8 Engine maintenance — p. 204
- 9.8.1 Checking oil and coolant — p. 204
- 9.8.1.1 Checking the oil level and adding oil — p. 204
- 9.8.1.2 Checking the coolant level and adding coolant — p. 206
- 9.8.2 Cooling system — p. 207
- 9.8.2.1 Checking and cleaning the combination cooler — p. 207
- 9.8.2.2 Checking the cooling system for leaks — p. 208
- 9.8.3 Air intake system — p. 208
- 9.8.3.1 Checking and cleaning the air filter — p. 208
- 9.8.3.2 Checking intake air lines — p. 211
- 9.8.1 Checking oil and coolant — p. 204
- 9.9 Hydraulic system maintenance — p. 212
- 9.9.1 Checking the oil — p. 212
- 9.9.1.1 Checking the hydraulic oil level and adding hydraulic oil — p. 212
- 9.9.2 Checking for leaks, wear, cracks and damage — p. 214
- 9.9.3 Checking the cylinders — p. 214
- 9.9.4 Checking the dust-caps on the couplers — p. 214
- 9.9.1 Checking the oil — p. 212
- 9.10 Transmission maintenance — p. 215
- 9.10.1 Checking the brake fluid level — p. 215
- 9.11 Ventilation system maintenance — p. 216
- 9.11.1 Checking and cleaning the pre- and main filter — p. 216
- conditioning unit) — p. 217
- 9.11.1 Checking and cleaning the pre- and main filter — p. 216
- 9.1 Installing the safety bracket — p. 157
- 10 Troubleshooting — p. 219
- 10.1 Troubleshooting procedure — p. 219
- 10.2 Complete machine — p. 219
- 10.3 Hydraulic system — p. 222
- 10.4 Cabin and controls — p. 222
- 11 Environment — p. 225
- 11.1 Waste disposal — p. 225
- 11.2 Safe disassembly — p. 225
- 12 Terms of warranty — p. 227
- 13 Appendix — p. 229
- 13.1 Dealer details — p. 229
- 13.2 Machine-specific information — p. 229
- 13.3 Pre-delivery checks — p. 229
- 13.4 Maintenance Log — p. 231
Capabilities
The source outline indexes controls, safety, operation, checking and adjustment, maintenance, and troubleshooting. Use these source-backed headings to locate the applicable operating or maintenance topic in the source PDF, then confirm model-specific notes, specifications, illustrations, and operating conditions at the relevant page before carrying out operation or routine maintenance.
Keep the source's safety sequence, prerequisite steps, labels, units, configuration notes, and footnotes with the selected task; do not apply an isolated value outside the conditions stated in the manual.
Delivery
This manual is supplied as a digital PDF file and is available for instant download after purchase. No physical media is shipped.
References
Kubota Operator Manual for Wheel Loader, document code TOB-0086435, PDF edition.



No questions found.